Thursday, February 23, 2023

It's Your Birthday- Now Make a Wish! :P

Hi Friends! Here's another project as a Guest Designer for Penguin Palace! Today's project uses the amazing 360 Degree Stencil! It's always super duper fun to see what background develops with different turns and even different inking techniques!

First, I stamped out the images from the Birthday Wishes Clear stamp set, then I colored and fussy cut  the images. 


Next, I used the Gazania Stencil. On a 6"x6" sheet of white card stock, I used Stencil A at 30 degree intervals and Spun Sugar Distress Oxide Ink. However, I concentrated the color on the edges of the stencil, this added more depth and dimension in the stenciling! I used the same technique and using Stencil B, only this time I used a darker pink ink (Kitsch Flamingo). 


Next, I used Stencil C at 30 degree intervals and with Shaded Lilac Distress Oxide ink. Then I used a stitched rectangle die to die cut the stenciled image for the card front. I also die cut a slightly larger rectangle using purple card stock.

Stamp the sentiment "Enjoy your special day" onto light blue yardstick, then die cut out. I used a ribbon die! 

To assemble the card, adhere the purple yardstick onto a card base, then adhere the stenciled background to the card front. Then adhere the sentiment toward the bottom middle of the card. Lastly, adhere the stamped images to the card. I used foam tape to add a little more dimension! :)


I hope you liked my card! Have a crafty day! <3

Products Used:

Copics Used:
Dark Browns: E25, E23, E34
Light Browns: E53, E51, E50
Skin tone: E11, E21, E00, E000
Cheeks & Tongue: R21, R10
Blues: B02, B01, B00, B000
Purples: BV02, BV01, BV00
Pinks: R83, R81, RV11
Greys: C4, C3, C2, C1, C0

Distress Oxide Inks Used: 
Spun Sugar
Kitsch Flamingo
Shaded Lilac


Friday, December 16, 2022

Lots of Love and Greetings from Santa

Hello friends! I'm sharing another card using Penguin Palace's 4th Anniversary Release! 

The Greetings from Santa clear stamp set is the perfect pairing with the Poinsettia Wreath Stencil! I started with a 6"x6" piece of white yardstick and then stenciled in the wreath. I kept it simple by using Candied Apple, Mustard Seed, and Lucky Clover Distress Oxide Inks for the wreath. Then I trimmed down the card stock to 5"x5"


Next, I stamped, colored, and fussy cut the Greetings from Santa Clear stamp using the copic colors listed below. 

Then I die cut a ribbon in black, and stamped the sentiment "We Wish You a Merry Christmas" onto the ribbon using embossing ink. Then I sprinkled some white embossing powder onto the sentiment, tapped off the excess powder, and heat set the embossing powder. 


I trimmed down some gold card stock to 5.5"x5.5" and adhered it to a card base. Then I adhered the stenciled card stock onto the card front. Next, I adhered the Santa and Mrs. Claus image in the center of the wreath. Then I adhered the sentiment underneath Santa and Mrs. Claus. 

Lastly I embellished the card with a few heart gems on the top corners because you know there's a lot of love  between Mr. and Mrs. Claus ;)

Penguin Palace Products:

Additional Products:

Copic Colors:
Skin: E95, E21, E00, E000
Cheeks: R11
Greys: C7, C5, C3, C1, C0
Greens: G19, G07, G05, G03
Reds: R37, R35, R14, R32
Yellows: Y26, Y23, Y21
Browns: E55, E53, E51
Blues: B00, B000, B000

Distress Oxide Colors:
Candied Apple
Mustard Seed
Lucky Clover


Thursday, December 15, 2022

Ice Skating Cutie and Snow Flake Beauty!

 Hi Everyone! It's been a while since I've blogged. But I'm hoping to do more in 2023! I was lucky enough to guest design for Penguin Palace 4th Anniversary New Release! There's lots of cute new stamps, dies, and most importantly new 360 degree stencils!

I used the Flurry Snowflakes Stencils to make a beautiful snowflake arch around the ice skater from the Most Wonderful Time clear stamp set

How To: 
First, on 6"x6" white card stock, I used Tumbled Glass distress oxide ink to create a sky background.

Then I positioned the paper into the 360 degree stencil, and then used the snowflake stencil B (the one with a heart in the middle) and Salty Ocean distress oxide ink. The pattern uses 60 degree turns, and you'll only need to stencil the pattern to make a half circle.

Stenciling in the Snowflakes: 
Next, prep the paper with anti-static powder. Then use snowflake stencil A and embossing ink and stencil one snowflake. Remove the stencil and sprinkle white embossing powder on the snowflake. Tap off any excess embossing powder, and heat set the embossing powder. 

Position the paper and snowflake stencil A and turn forward 60 degrees, stencil with embossing ink. Then carefully position the stencil back over the white snowflake and turn the back 60 degrees. Remove the stencil and paper, sprinkle silver embossing powder over the stenciled snowflakes. Tap off any excess embossing powder, and heat set the embossing powder. 


Die cuts:
Die cut the white card stock with the stenciled snowflakes using a stitched rectangle die.

Using a white glitter card stock, die cut with the same stitched rectangle die that was previously used. You only need a partial rectangle that is about 2-3" tall, die cut the unstitched end of the triangle using a snowbanks or hills border die.

Using a metallic blue card stock, die cut with the same stitched rectangle that was previously used, again you only need a partial rectangle that's about 2" tall. Die cut the unstitched end using a lake die, making sure the die cut is shorter than the snowbanks. 

Using dark teal card stock, die cut a scalloped rectangle and a sentiment label. On the sentiment label, stamp the sentiment "Cheers To A Joyful Season" using embossing ink. Sprinkle white embossing powder onto the sentiment and tap off any excess powder. Heat set the embossing powder. (If you prefer to stamp and emboss first, and then die cut please do so! :) )


Stamp, Color, and Fussy Cut:
Stamp out the ice skater and two sets of trees onto white card stock. 

Color with Copic colors listed below or your choice of coloring medium.

Fussy cut or use the coordinating Penguin Perfect Cuts!

Putting it all Together:
Adhere the scalloped rectangle onto an A2 card base. 
Then adhere the stitched rectangle with the stenciled snowflakes onto the scalloped rectangles.
Next, adhere the snow banks die cut onto the card front, then adhere the lake to the card front.

Adhere the ice skater using foam tape. Then adhere the trees on each side of the ice skater. Adhere the sentiment on the top center of the card front.

Lastly, embellish the card with some glitter enamel dots to add some extra magic!

Copic Colors:
Skin color: E95, E21, E00, E000
Cheeks: R11, R20
Hair: E29, E25, E23
Blues: B02, B01, B00, B000, B0000
Purples: BV02, BV01, BV00, BV000

Penguin Palace Products:

Additional Products: 

Saturday, May 7, 2022

Gorgeous Mandalas - 360 Degree Stencil

 Happy Saturday! I was fortunate enough to be asked to Guest Design for Penguin Palace for their 360 Degree stencil release! If you're not familiar with the 360 Degree Stencil it's AMAZING and so innovative! It's an amazing stencil system that enables you to stencil in 360 degree patterns. As you adjust the increments or degrees of stenciling, the patterns become different! It's really cool, there's even ways you can use other stencils with the system to really stretch your supplies! 

Find out more on the Penguin Palace Website! 

There are currently 4 new stencils available for pre-order, below are a few projects that I made with the Mandalas Bundle Set. 

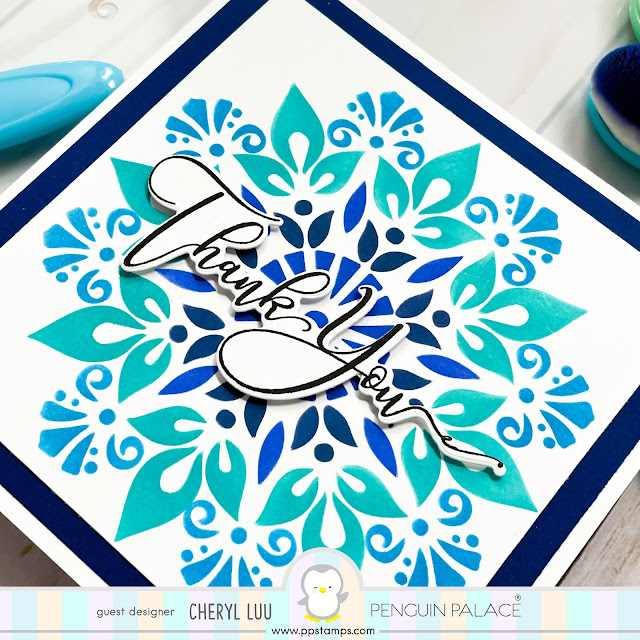
My first card is all about the blues! I love monochromatic cards and this stencil is so beautiful. The system might look complicated but the pattern came together really fast since it's designed to not need any masking!


Products Used:

Distress Oxide Inks Used:
Chipped Sapphire
Blueprint Sketch
Peacock Feathers
Mermaid Lagoon


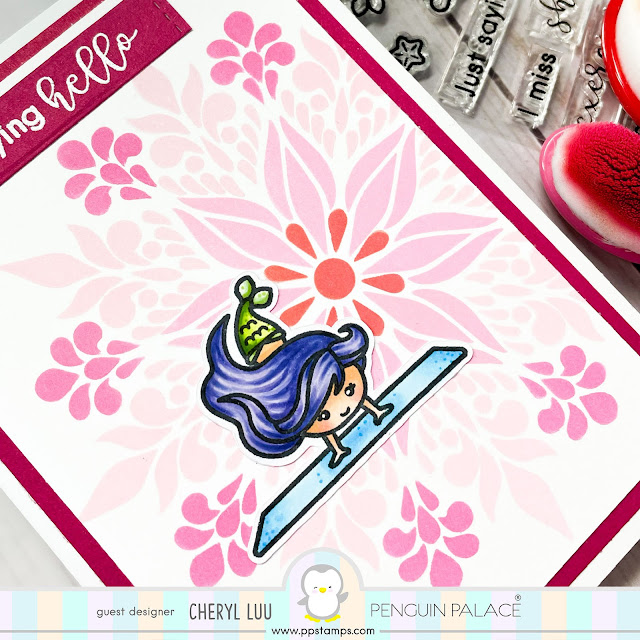
Another way to use the stamp is as a simple backdrop for cute images! Mandalas and Yoga goes hand in hand so I had to use this cute little mermaid with this pink mandala!

Products Used:

Distress Oxide Inks Used:
Spun Sugar
Kitsch Flamingo
Picked Raspberry
Candied Apple


For my last card, because this pattern reminded me of a sunburst I thought this was the perfect background for this little Hawaiian girl. 

Products Used:

Distress Oxide Inks Used:
Squeezed Lemonade
Mustard Seed
Carved Pumpkin


Check out the Penguin Palace Blog to see more ways the Guest Designers used the amazing Mandalas Stencil Bundle!


Tuesday, April 26, 2022

An ICONIC Weekly Planner Layout with America's Favorite Red-Head

Howdy friends!! I've been neglecting my blog but I'm hoping to more tutorials and provide some tips to those new to planners and planner stamping once my kiddos are out of school for the summer! ;)

Anywho! I'm here to showcase Scrappy Boy Stamp's FABULOUS April release. It features an ever so iconic and fabulous Red Head! In fact, the release is called "Everyone's Favorite Red Head"!

I created a weekly planner layout in my B6 ringed planner!


The theme is Friends Forever and on the left I've got the ladies looking gorgeous. I used the large heart from the Chocolate Factory Scene Builder Stencil to create the background in the picture below. 


Then on the right, I created the scene of the ladies working at the chocolate factory! The Chocolate Factory Scene Builder Stencil made it so easy to make my planner pages worthy of this icon <3. 


Join the fun in the Scrappy Boy Stamps Inspiration Group on Facebook to see lots of Scrappy Boy projects!!! 

Scrappy Boy Stamps Products Used:

Planner Stamps Used:

Copic Colors Used:
Skin: E11, E21, E00, E000
Cheeks: R21,R11
Lips:R29, R24, R14
Red Head Hair: YR68, YR16, YR12
Blonde Hair: E55, E53, E51
Pinks: R83, R81, RV11
Red Violets: RV69, RV19, RV66
Blue Greens: BG15, BG34, BG11, BG10
Purples: BV02, BV01, BV00, BV000
Browns: E27, E25, E15
Shading: N2, N1, N0

Distress Oxide Inks Used:
Tattered Rose
Kitsch Flamingo
Abandoned Coral
Rusty Hinge
Walnut Stain


Tuesday, February 22, 2022

BOOM! SPLAT! It's Super Hero time - Comic Book Inspired Planner Layout


Hi Crafty Friends! I'm excited to show you one of my first projects with the Scrappy Boy Stamps Design Team!  The February release is SUPER! I love how Scrappy Boy Stamps' releases includes almost everything I need to do create an epic planner layout! 

I created this planner layout on B6 sized grid paper and drew in the boxes to replicate a comic book. I stamped the images onto sticker paper, fussy cut them, and then color the images in with Copic markers. 

For the month header, on sticker paper, I used a copic safe fine liner pen and drew the action bubble using the Comic Builder Slimline 2 Piece Stencil. I used a brush pen to create a bit of a shadow to add depth, then I stamped in the letters into the bubble and then colored it in with markers. For the days of the week, I stamped the days of the week onto sticker paper and then drew a box around the days using a ruler. I added a bit of a shadow for the days too. Fussy cut the month and days of the week headers.


Next, I masked off the bigger blocks to color in the backgrounds. First, I used a light distress oxide ink, and then stenciled in the backgrounds using both the Comic Builder Slimline 2 Piece Stencil and the Halftone Dot Background Stencil using a darker color. 

Remove the masks and then adhere the stamped images as shown in the picture. Trim the stamped images as needed to fit into the blocks. Lastly, stamp in the calendar on the bottom left corner.


SHAKER CLIP TUTORIAL 

Ok, now let's talk about these cute shaker paper clips! The paper packs that are part of this release are AMAZING and I had to make some clips to go with this layout! 

Using small nested circle dies, cut out 3 small circles with your choice of patterned paper. Then in one of the small circles that you had just cut out, use a smaller circle die to cut out the center of the circle to make a "window".

Use the same sized die that was used to cut out the 3 circles, die cut a circle out of acetate and glue to the back of the small circle with the "window". 

Next, trim some foam tape (I usually trim it down to about 1/8"), remove the backing of the tape and adhere the tape to the perimeter of the small circle. Repeat the last step so you have two layers of foam tape (this makes it so you have plenty of room to shake it!).

Add your shaker elements, then carefully align one of the full circle die cuts to cover the circle with the "window", which will adhere with the foam tape that's already on the circle with the "window". 

Then, using a hot glue gun, adhere a large paper clip to the back of the shaker (make sure you glue down the side with one loop, if you glue down the side with two, you won't be able to use the clip to fasten papers). Next, adhere the 3rd circle die cut to shaker, covering up the paper clip.

Lastly, stamp your choice of action sentiment onto white cardstock, and color with copic markers or your choice of coloring medium. Fussy cut, and adhere to the front of the shaker clip!

Distress Oxide Inks:
Reds: Abandoned Coral, Candied Apple
Blues: Tumbled Glass, Broke China
Greens: Twisted Citron, Cracked Pistachio
Yellows: Squeezed Lemonade, Mustard Seed


COPIC Colors: 
Fair Skin Tone: E11, E21, E00, E000
Dark Skin Tone: E18, E17, E15, E13
Cheeks (girl superhero): R21, R11
Brunette Hair: E77, E74, E71
Blonde Hair: Y19, Y15, Y13, Y11
Black Hair: N8, N6, N4
Reds: R39, R37, R35, R14, R32
Blues: B16, B04, B02, B01, B00, B000, B0000
Greens: G17, G07, G05, G03
Oranges: YR68, YR14, YR21
Yellows: Y19, Y15, Y13, Y11
Greys: N4, N3, N2, N1, N0

Products Used:


Tuesday, October 26, 2021

Club La-La Land Crafts October Kit - More Project Inspo

      Hello Crafty Friends, I'm here to reveal the Club La-La Land Crafts July 2021 Stamps and Dies Kit!

What is Club La-La Land? 

It's a monthly subscription with exclusive coordinating stamps and/or dies from La-La Land crafts. Each month you'll receive a package with a kit based on your choice of subscription plan - Stamps and Dies, Stamps Only, or Dies only.

Step-by-Step Project Tutorials from the Club La-La Land Crafts Design Team are also included with your subscription!


This month is full of winter fun! <3

My first project is a card showcasing the cuteness that is Snowflake Sweater Marci! I felt like using pastels on her! Doesn't she look so Sweet? 


COPIC COLORS:
Marci's Skin: E11, E21, E00, E000
Marci's Cheeks: R10, R11
Marci's Lips: R22, R21 Marci's Hair: E55, E53, E51
Blue-Greens: BG32, BG11, BG10, BG0000
Pinks: R81, RV11, RV00, RV000

My second card is a slimline card. I'm using the adorable Penguins from the Waddle on stamp set. The snowflake die that comes with the kit is so nice and big!

COPIC COLORS:
Penguins: N7, N5, N3, N1, N0
Penguins' cheeks: RV00, RV000
Penguins' beak and feet: Y26, Y23, Y21
Hat & Scarves: B95, B93, B91, B66, B63

It's Your Birthday- Now Make a Wish! :P

Hi Friends! Here's another project as a Guest Designer for Penguin Palace ! Today's project uses the amazing 360 Degree Stencil! It...